Today I've written an excruciatingly detailed look at how to buy, install, and use a Hi-Pass system for speeding through toll gates in Korea.

The Hi-Pass system uses a transceiver placed in your car that is "read" by the toll gate as you pass through, meaning you don't have to stop your car to pay the toll. This not only saves time but also generally results in cheaper tolls.
- An on-board transceiver device. It usually sits on the dashboard and beeps when you drive through the Hi-Pass gate to indicate you pay a toll. It can be set-up at the ExCard website. This device must be registered to the vehicle itself.
- A special Hi-Pass payment card, which can be inserted into the above-mentioned device. It can be set-up at the Hi-Plus website. It should be registered to your bank account.
This post will walk you through both of the procedures: buying and registering the transceiver device, and buying and registering the payment card. Hopefully I'll include enough detail to help you feel comfortable and confident.
So let's start.
Part 1 -
Hi-Pass payment card registration
First, I'll assume you already have a Hi-Pass card. You can buy these at nearly any convenience store, highway rest stop, toll booth office, or just buy one cheap (around 5,000 won, ~$5) from Coupang.
 |
| Hi-Pass payment cards on Coupang |
When you get the card, you need to activate it at a website. Registering the payment card itself (not the device; that will be the next section), can be done easily on any browser and any computer type, even from your mobile phone browser. But registering the terminal device (next section) may require a Windows PC. See more on all that in Part 2.
To register my Hi-Pass card, I need to visit the Hi-Pass website at https://www.hipluscard.co.kr/
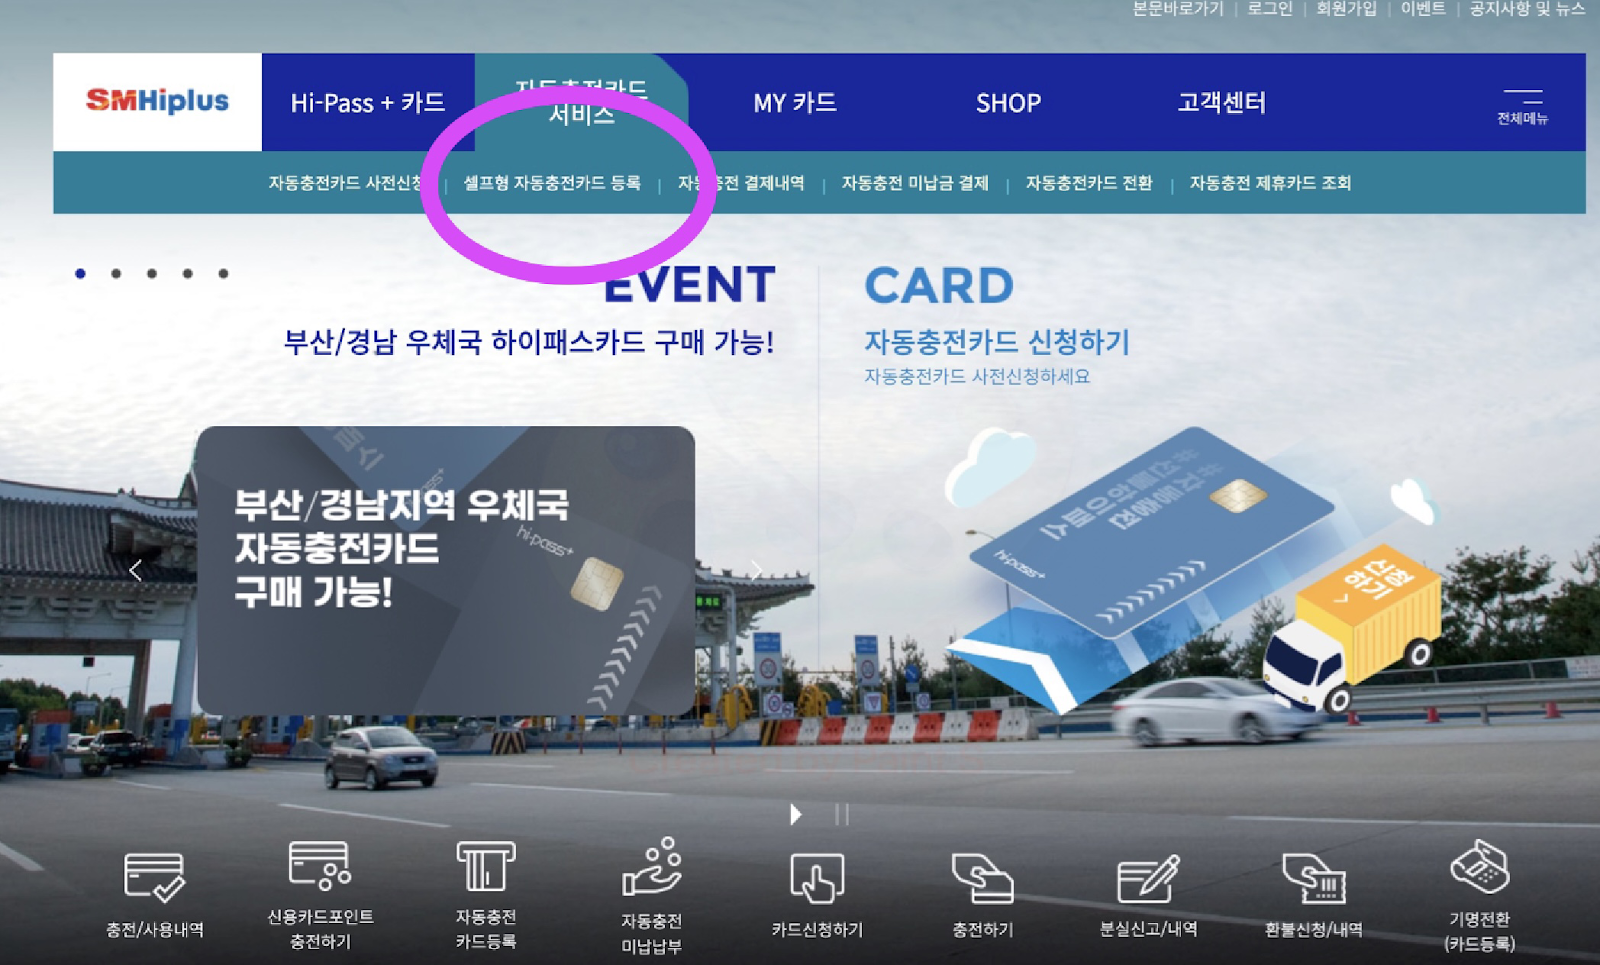
Click through to the section for 셀프형 자동충전카드 등록 (self-register automatic recharge card). Or just go directly there here: https://www.hipluscard.co.kr/hpc2016/auto_recharge/self_card_register.jsp
If you're doing this on mobile, the page may look like this:
This is where I will register the payment card itself, and have it connected to my bank account so that I don't ever need to manually add money to it either by transfer or cash top-up. This is the preferred method of most Koreans I know, but there are other options. Let's take a look.
Types of Hi-Pass cards

At this point I should note that there are three main types of Hi-Pass payment cards:
- 자동충전카드 (Auto-charging card)
The original Hi-Pass card that automatically withdrawals from your bank account. Standard automatic withdrawal of 50,000 won, with automatic top-ups when you get below 10,000 won. You can visit a highway office in-person, or apply for the card online (by verifying ID and providing bank account details) and they will mail it to you for free (or 3,000 won, depending on your method). It will be ready to use immediately, without registering online, because you already registered it when you were placing the order. - 셀프형 자동충전카드 (Self-type auto-charging card)
Nearly identical to the previous card, but this kind can be purchased anywhere, including online malls like Coupang, convenience stores, etc. Literally the only difference I can find between this and the card above is that, in addition to verifying your ID and bank account details on the website, you also will need to type in the serial number printed on the back of the card when applying on the website. Also, it will take 24 hours from that point to activate. Otherwise it functions exactly the same. Because of the greater ease of acquiring the card, this is now the most popular type. It's only a "self-type" because you have to type in the card serial number yourself. Hardly hard work. - 선불 일반카드 (Pre-paid card)
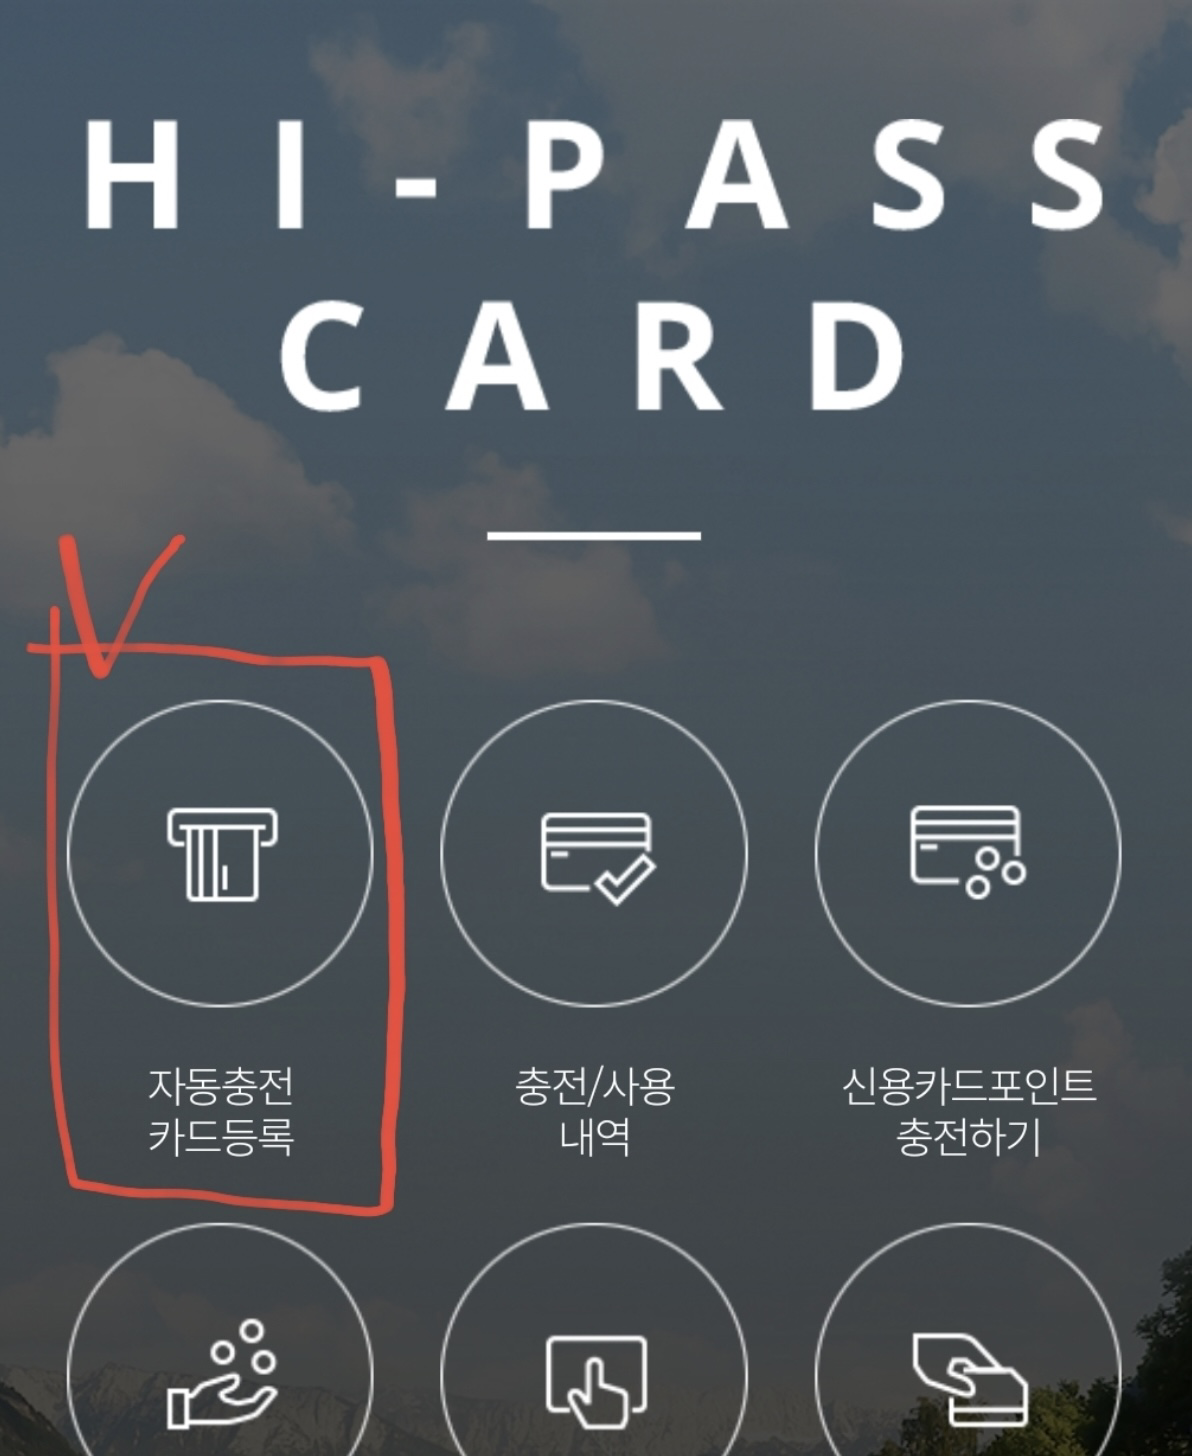
The easiest to get. No need to sign-up for anything, no bank account connections. Can buy this card at most convenience stores nationwide, highway rest stops, toll gate offices, or online. This is an easy option if you don't want to deal with Korean websites or banks: just take the card in to a local CU or GS25 shop (or buy it there), hand the clerk the card and some cash. They'll know what to do. Good option for people who want to use the Hi-Pass lanes but won't be in-country long. Think of this as basically a highway-use version of the subway/bus T-money card. Just like you can top-up the T-money card at convenience stores or unmanned kiosks in the subway stations, you can top up the Hi-Pass card at convenience stores, unmanned kiosks at highway rest stops or in the highway agency booths located just after most toll gates, or even by handing cash and the card to the toll booth worker. Pro-tip: if you don't mind skipping the Hi-Pass lane and using the regular manned/unmanned kiosks, you can just straight up use a normal T-money card too.
UPDATE: Hi-Pass enabled bank cards
Recharging your Hi-Pass card
(and dealing with unpaid tolls, etc.)
 |
| Translated list of convenience stores where you can top-up funds on your Hi-Pass card |
You can also drop by the Highway Agency's offices usually located just after a toll gate. They look like this:
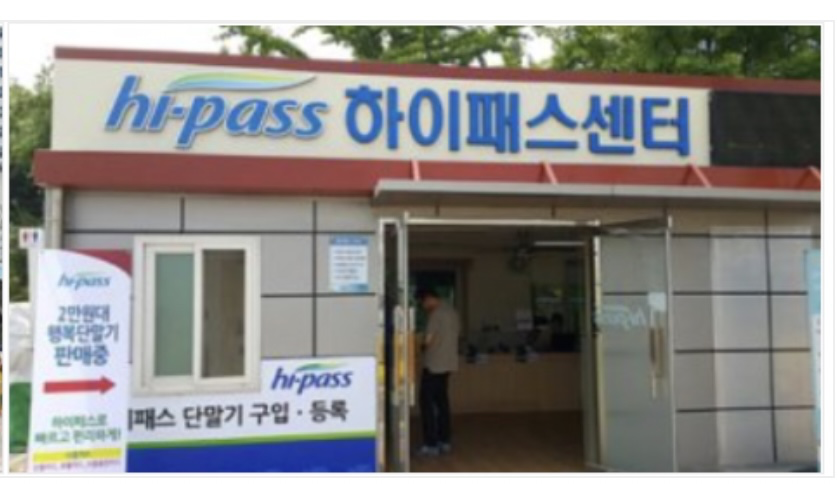 |
| Manned Hi-Pass Center outside a tollgate area. Image: oneclock |
 |
| Unmanned Hi-Pass highway center outside Gimpo |
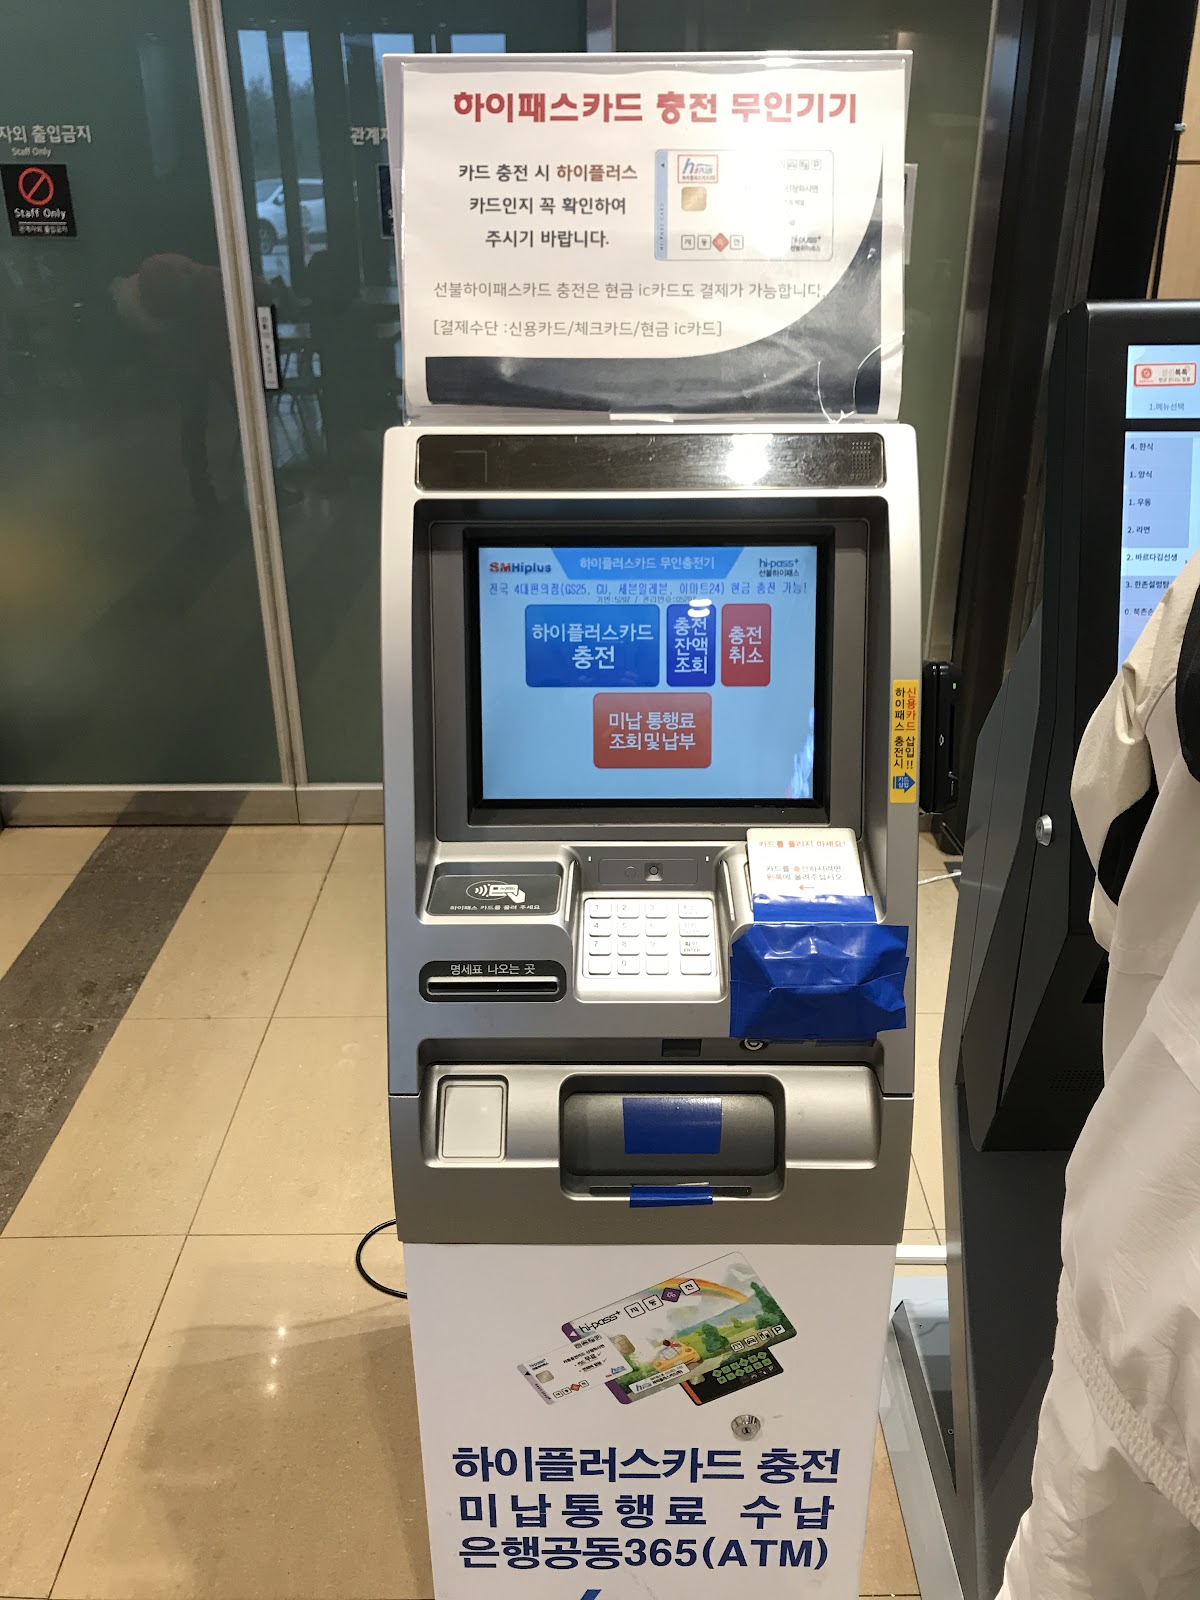
Here you can top-up your payment cards, pay unpaid tolls, etc in-person if that's your thing. The manned and unmanned centers will both have special kiosks for topping up cards or paying unpaid tolls (with no penalty). That machine looks like this:
 |
| Unmanned kiosk for paying highway tolls at a tollbooth office just passed the toll gate |
 |
| Kiosk for recharging Hi-Pass cards and paying unpaid tolls, found at a rest stop 휴게소 |
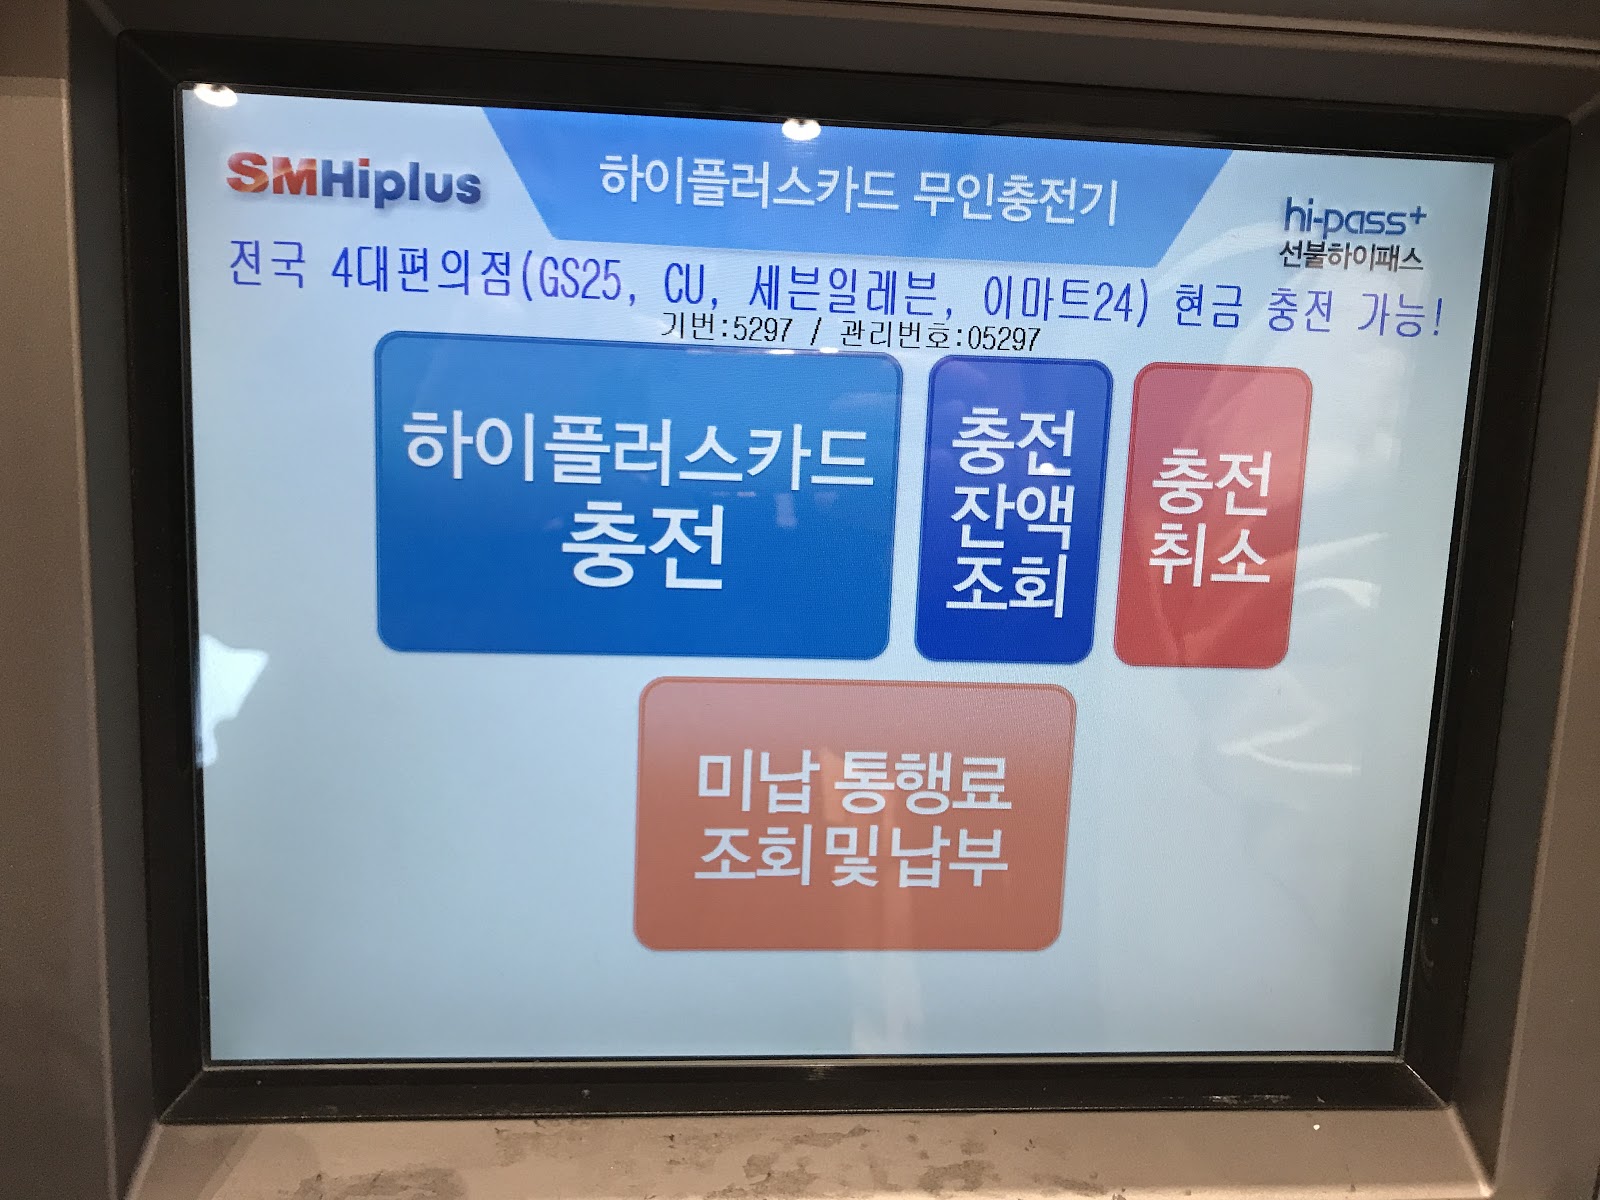 |
| Screen of the kiosk. No English options but simple interface. The top 3 buttons are all related to the Hi-Pass card. The bottom Orange button is for viewing / paying unpaid tolls. |
There are also gift cards, special promotional cards, and cards available to select groups for select reasons, like special cards for the disabled or etc.
- inside a Hi-Pass card-reader terminal mounted in your vehicle to speed through the blue Hi-Pass lanes, and/or
- use them as a tap-and-go payment at the e-reader pads attached to the normal toll booths or drive-up kiosks
I'm going to walk through the registration of the "self-type auto-recharge card" (셀프형 자동충전카드) because that is what I bought because that is the most common.
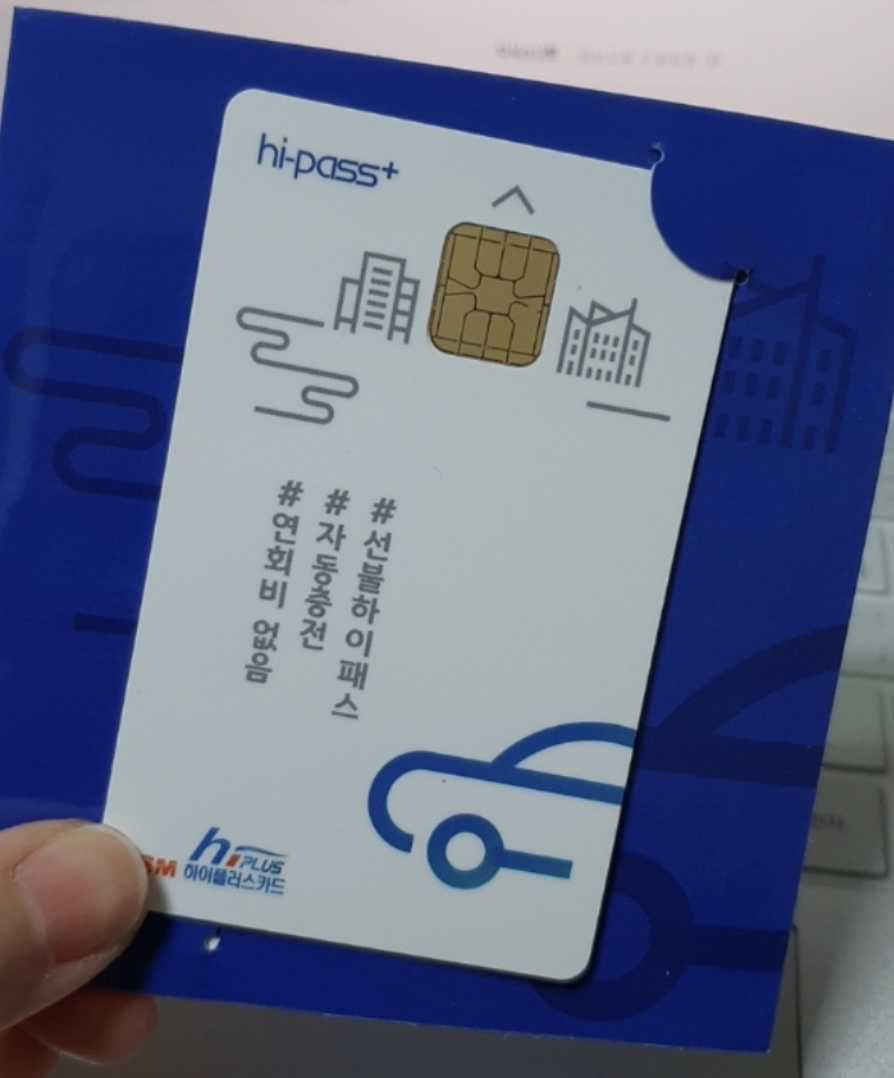 |
| Sample Hi-Pass self-registration type card. Image: myoungeun |
Anyway, registering my card online will set it to automatically deduct money from my connected bank account, similar to how KakaoPay will automatically top-up itself from your bank account when funds start running low. So you shouldn't ever have to manually add money to this yourself or even pay attention to how much the card is loaded with. Good for convenience, but if your account balance hovers at less than 100,000 won or so, maybe not a great idea.
This is extra true because if somehow the auto-withdrawal from the account fails (you close your account, have insufficient funds, etc), the card may stop working completely and you'll have to reregister it. As I mentioned, it will withdrawal 50,000 won each time your card needs a top-up, and that is defined as when the card's balance falls below 10,000 won. I don't know about how you roll, but a surprise 50,000 auto-withdrawal from your account might not be a great idea for everyone. So consider a pre-paid card if that fits your situation better.
I would love a system where the card simply deducts the exact amount of your toll from your bank account, no more no less, like a normal credit card payment. But I guess that's wishful thinking for now.
Assuming you're registering this self-type card, let's proceed. Of course all the card registrations follow the same basic layout so what works for this ought to be an extremely similar process for the other card type registrations.
Registering the Hi-Pass payment card
Let's get back to the 셀프형 자동충전카드 등록 (self-register automatic recharging card) page. The page is all in Korean of course, but use Chrome auto-translate and pretty much everything you'll need to do becomes clear.
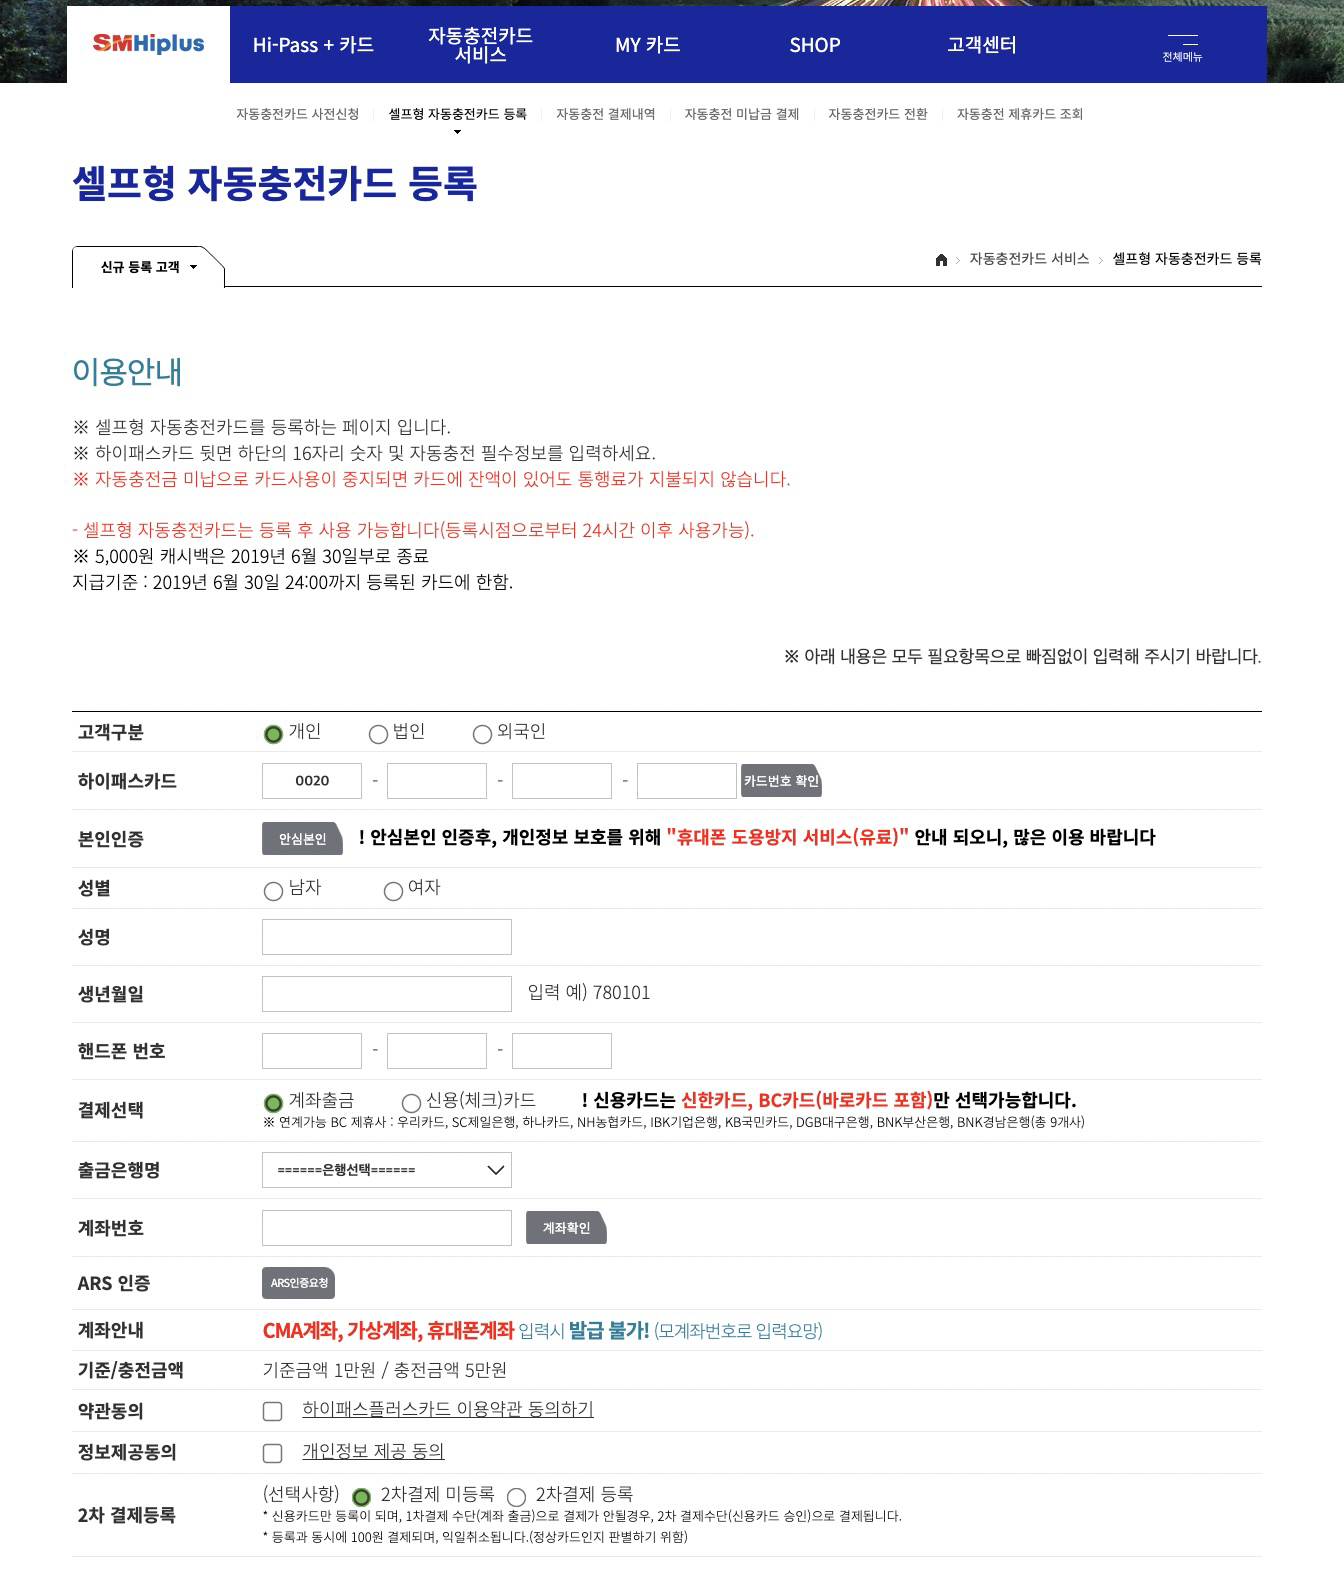 |
| Hi-Pass payment card registration page (Korean) |
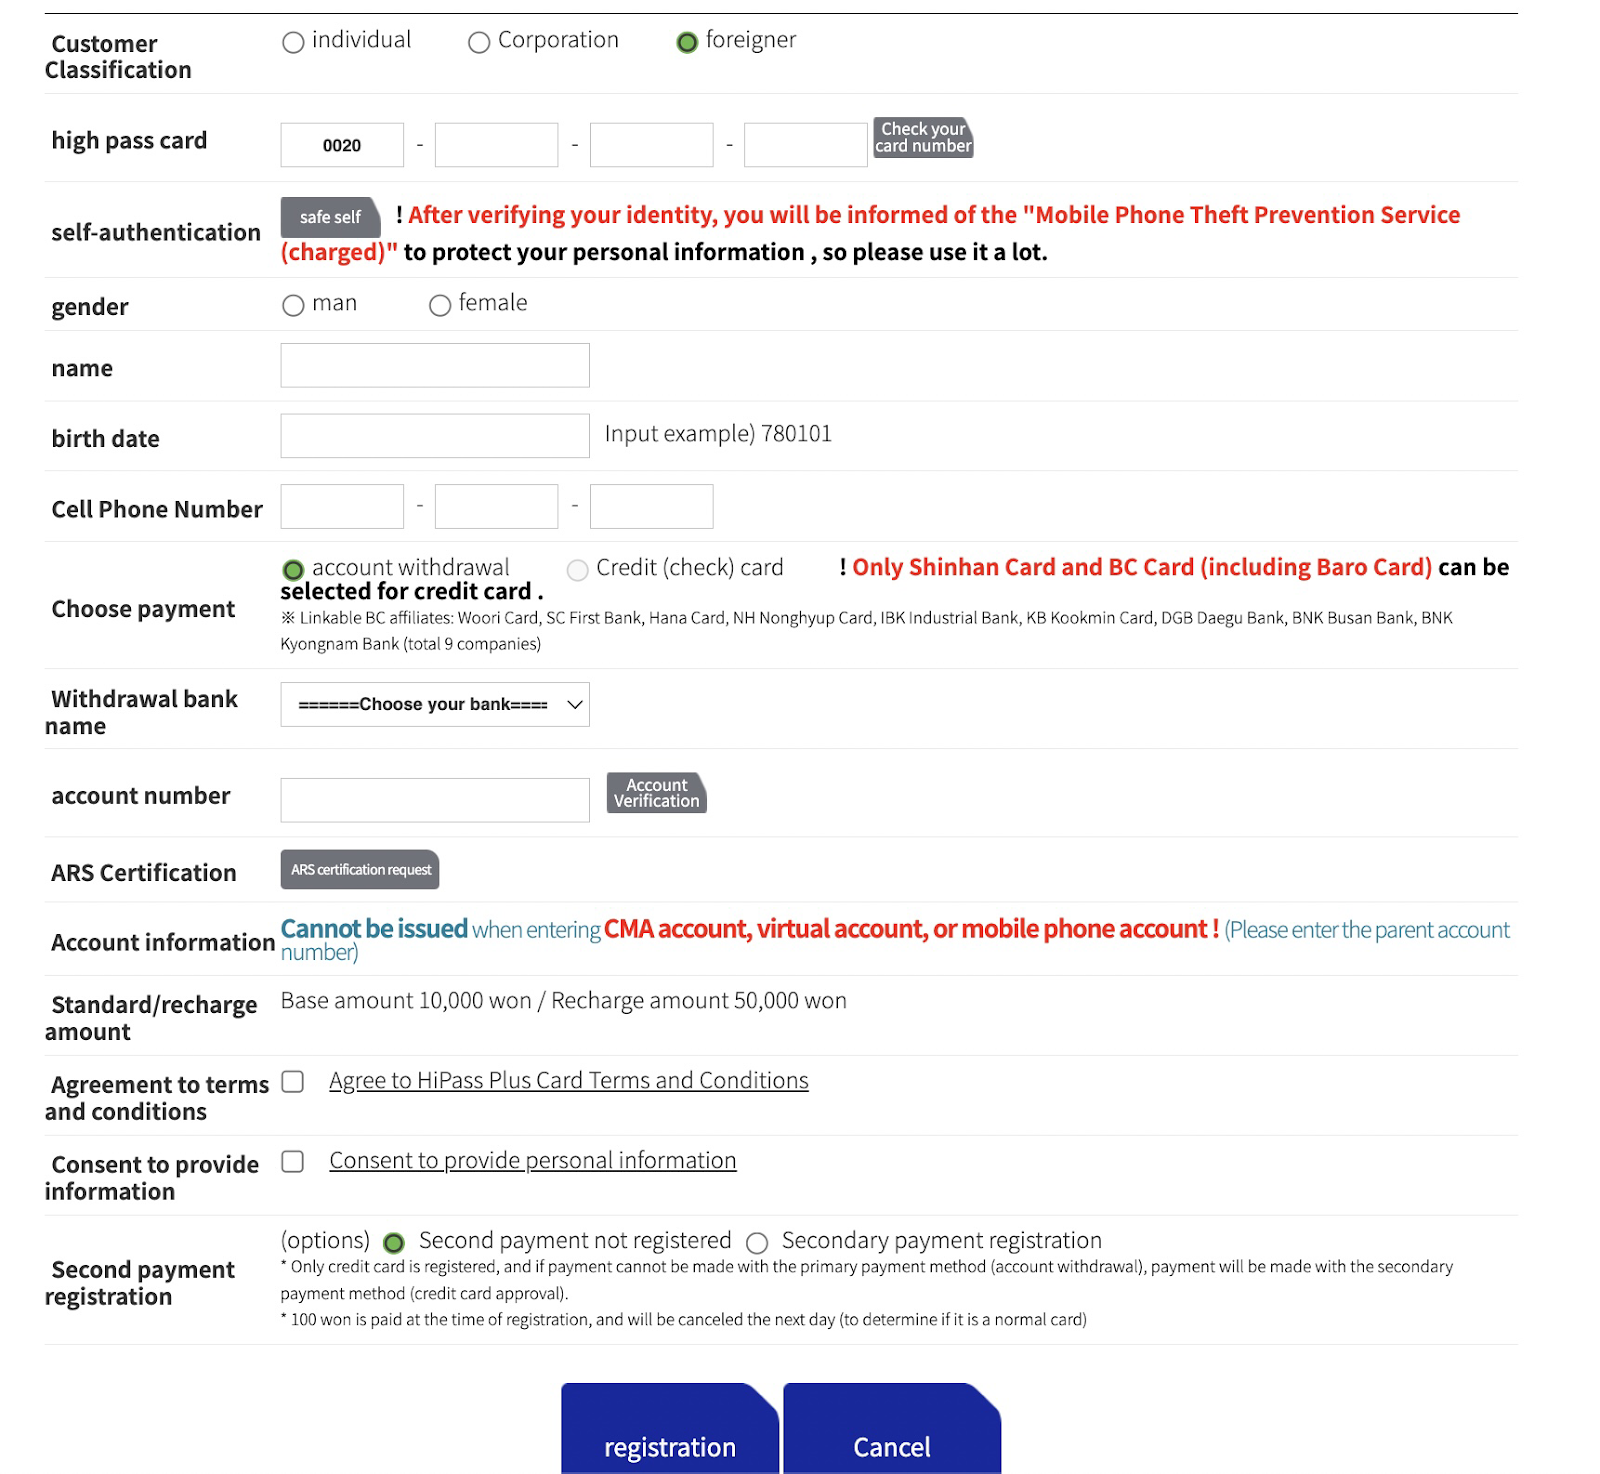 |
| Hi-Pass payment card registration page (auto-translated to English by Google Chrome) |
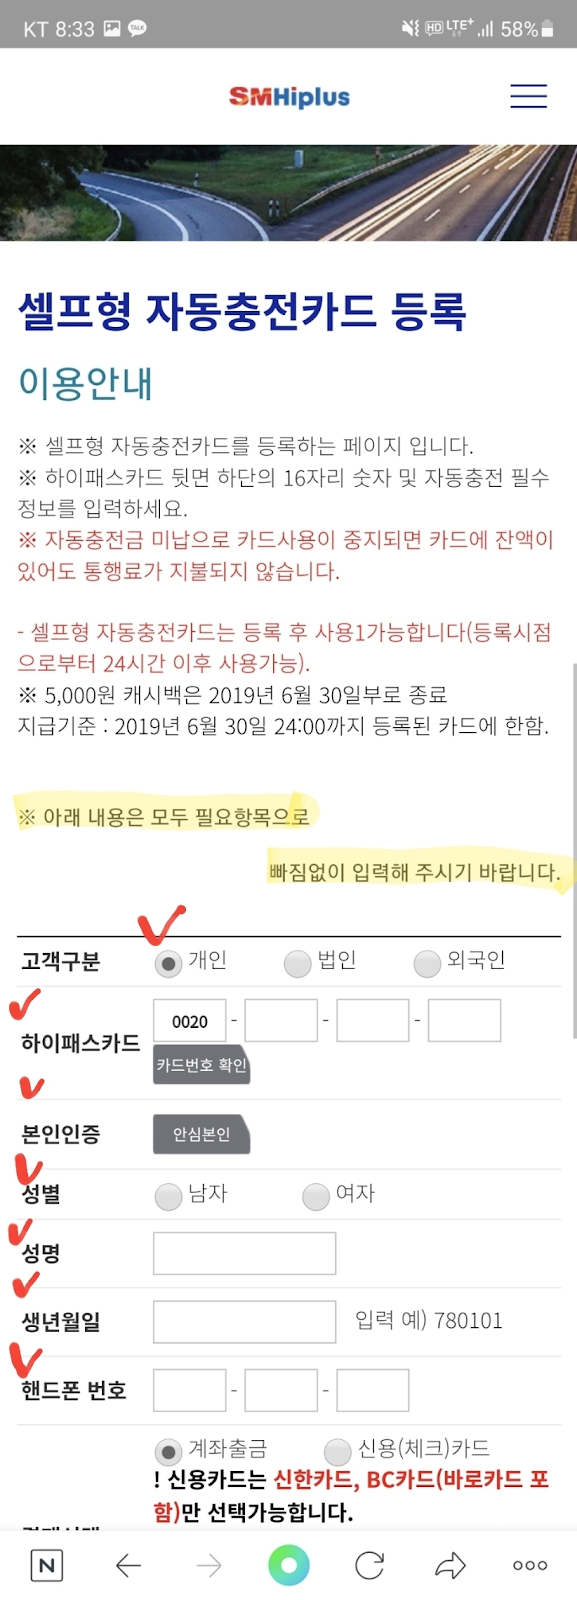 |
| Hi-Pass payment card registration page on mobile browser. Image: myoungeun |
Anyway I'll go through each step. I'll refer to the way Chrome translates the items for convenience but also leave the originals side-by-side.
Previously I don't believe it was possible for foreigners to register a Hi-Pass, so nice to see this is now an option.
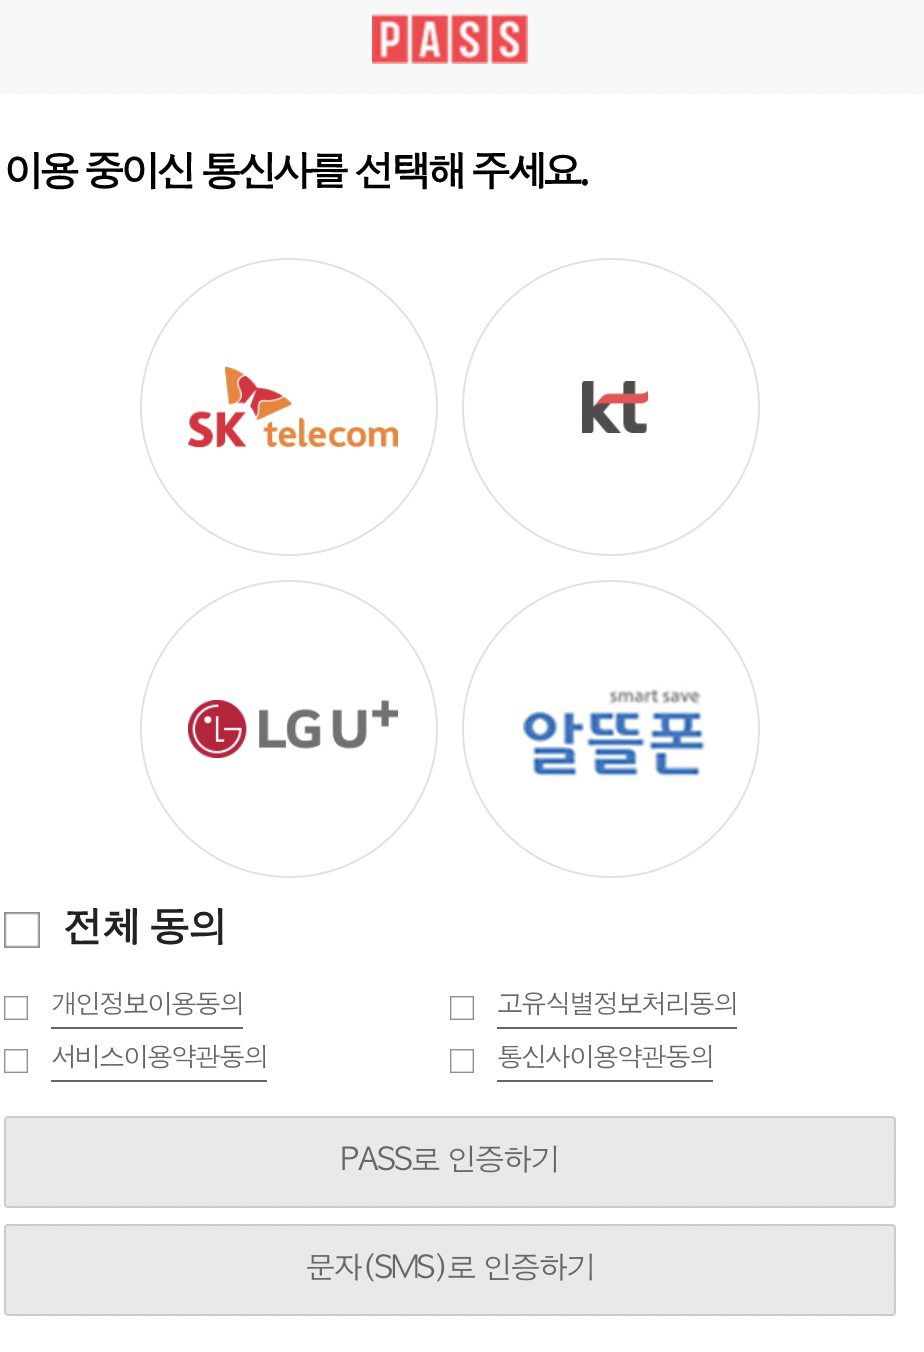 |
| Choose your telecom phone company for ID verification. Be sure to hit the checkboxes. |
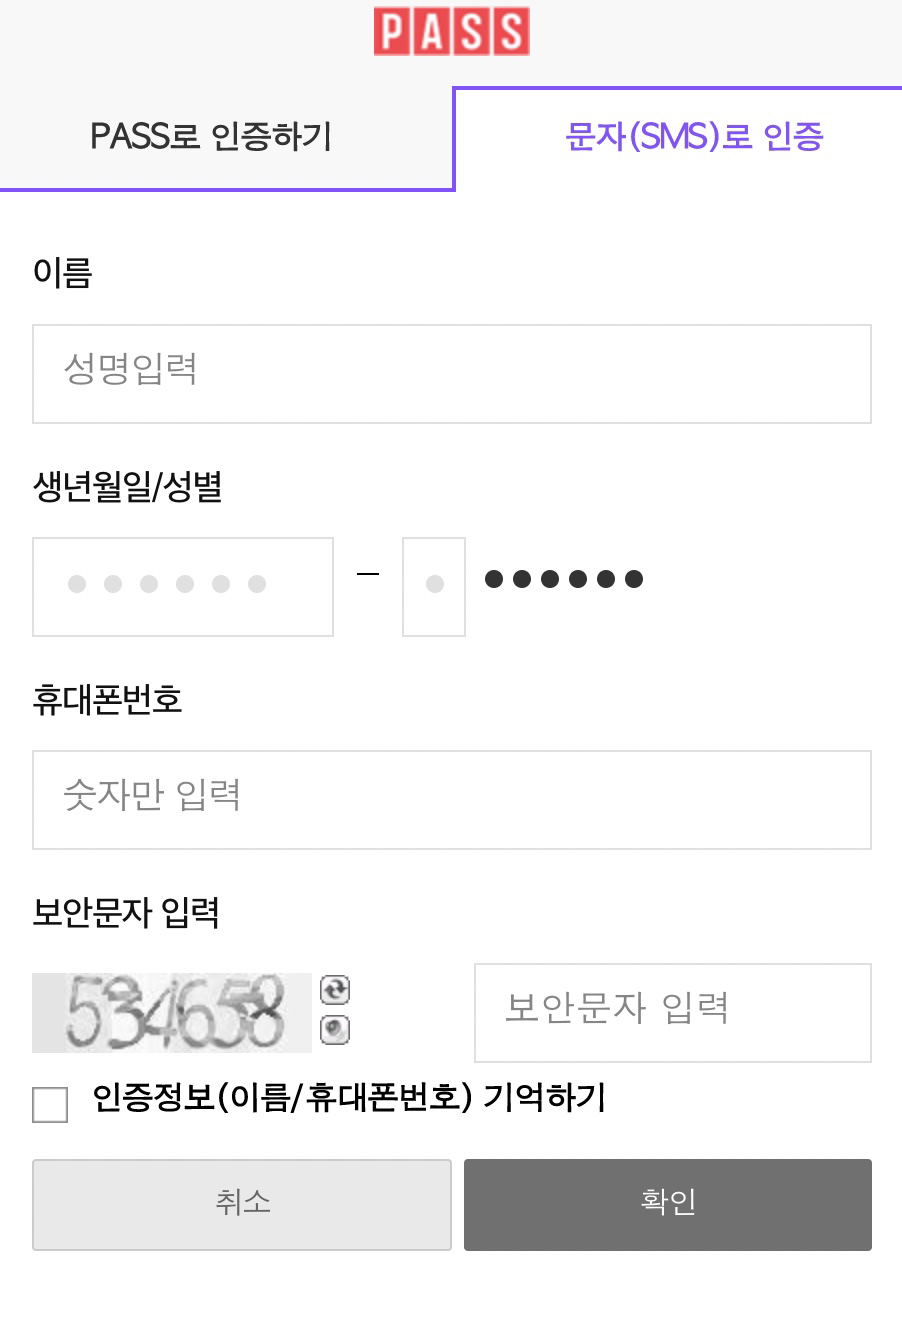 |
| Input your name (exactly as registered), Alien Registration card number (your birthdate then the 1st digit of the second string of your number), your phone number, and the CAPTCHA. |
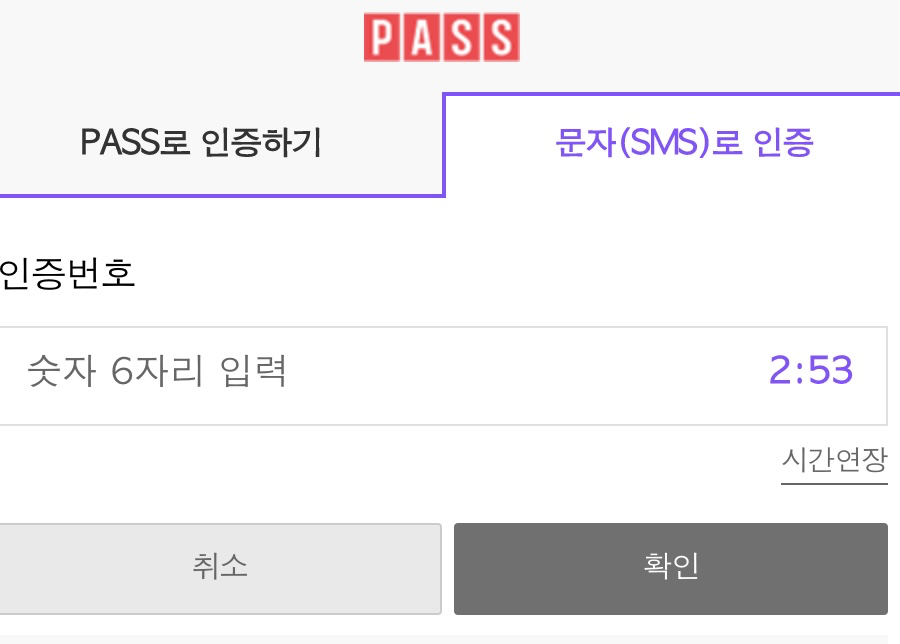 |
| Wait for the SMS verification code to arrive at your phone then type it here. |

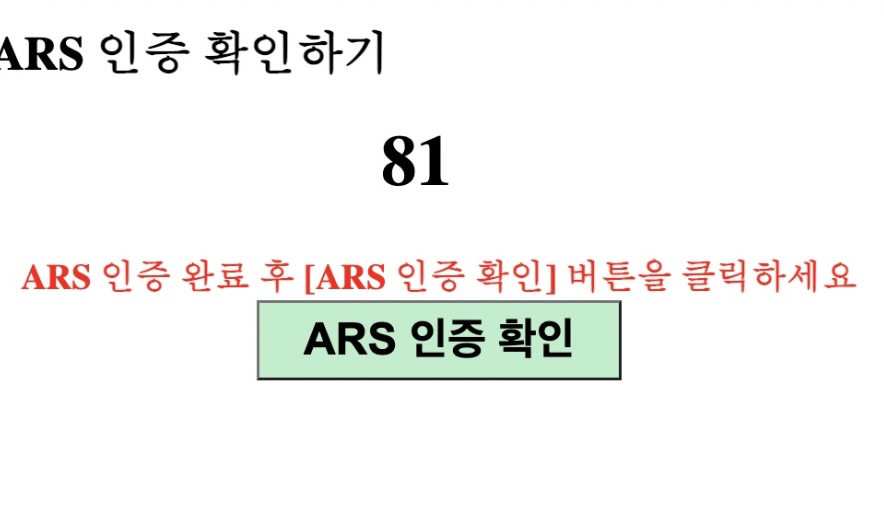 |
| ARS pop-up telling me what to dial on the keypad when the robot voice calls |
Hit the button and you will receive a phone call from an automated robot voice telling you "blah blah blah you are attempting to register blah blah." When the voice stops talking, enter the number "81" on your phone's dial-pad. Once that's done, hit the greenish ARS button.
That should be good to go. The Hi-Pass card is now connected to your bank account.
Payment card done, terminal next
Part 2 -
Hi-Pass card reader terminal device (OBU) registration
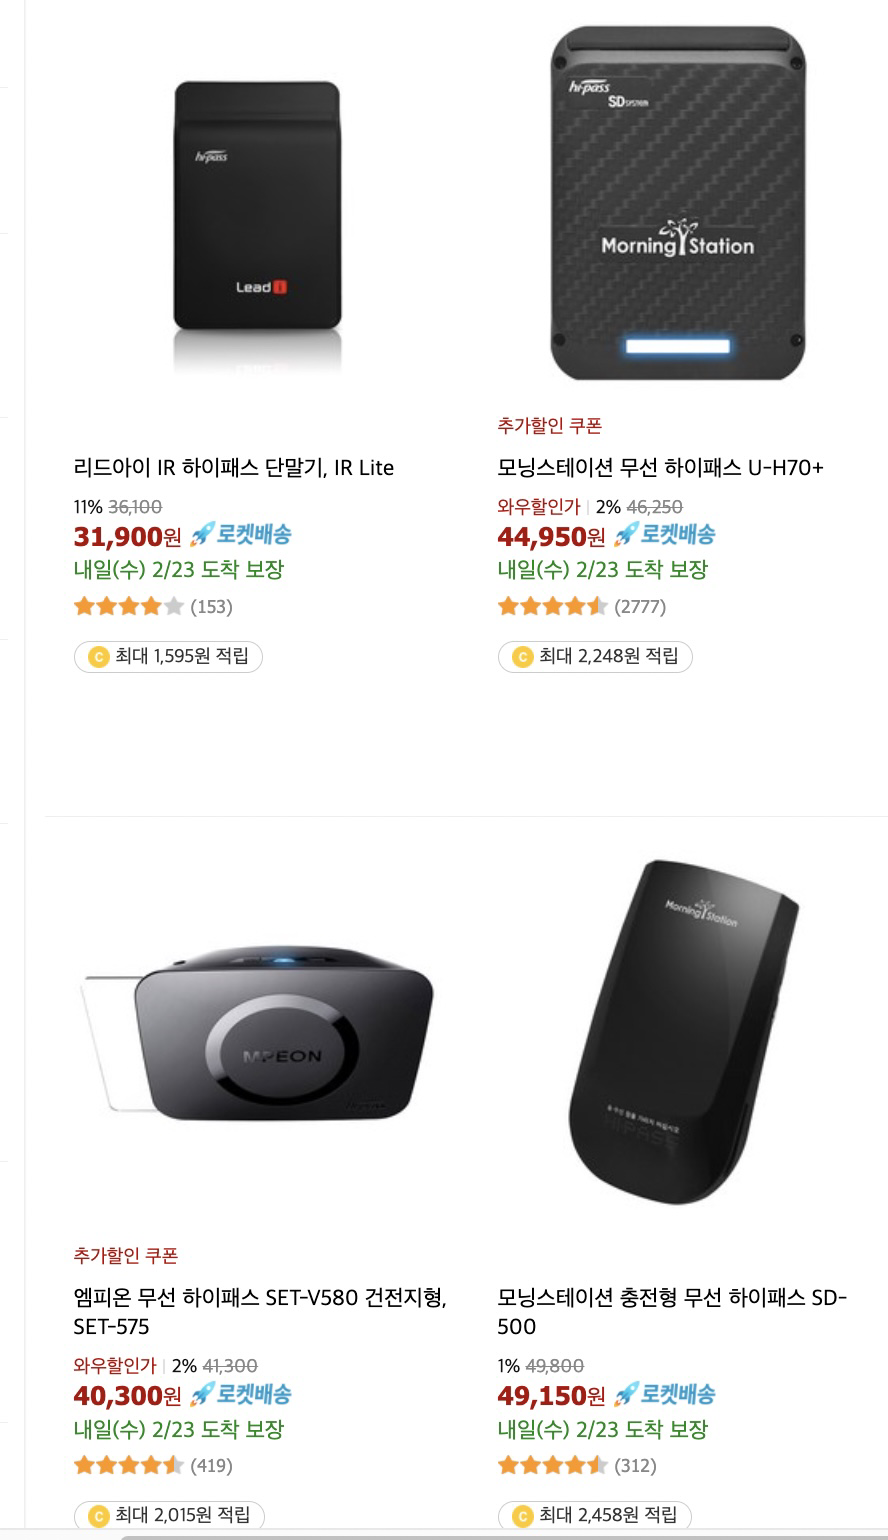 |
| Coupang search for 하이패스 단말기. Image: Coupang |
Frankly I don't know why anybody would pay more than 40,000 won for one of these.
Now you're probably saying "wait, I thought most cars today have these already installed, so why should I do this?"
The difference between Hi-Pass card reader terminals
Before we go on, there are two main types of Hi-Pass terminals you should know about.
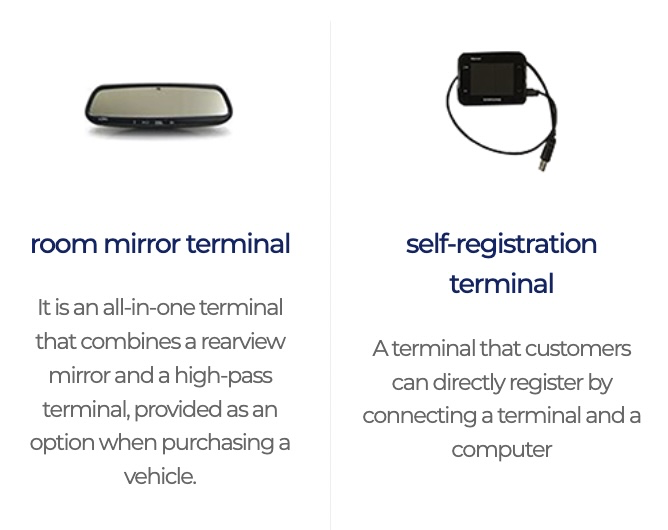 |
| Two types of Hi-Pass terminals. Image: Chrome translation from the exCard site. |
- 룸미러 단말기 (Rear-view mirror terminal)
These are the terminals that often come pre-installed in a vehicle. They are generally smaller, wired into the car's power supply, and generally un-removable, or they are built into the rearview mirror itself. Many new cars come with this. They may or often may not use a payment card like above. These are not the type I am discussing right now, but scroll down and I will discuss a bit about how to register these too. - 자가등록 단말기 (Self-registration terminal)
These are the terminals that you can install yourself by sticking to the windshield or dashboard. They likely will require a payment card to be inserted into them. They run on batteries or a cigarette lighter power adapter. You can easily move these from one car to another in theory, but remember that legally you must ensure it is registered to the car you are using it in. Don't just go swapping these around. Register them to the car you're using it in and leave it installed there. This is the type I'm mostly talking about here. And this is the type that requires the PC USB connection I will talk about now.
So I will discuss the 자가등록 단말기 (Self-registration terminal) type first, because that is what I have, then I will comment on the other type.
Why you need to register your terminal to your car
We need to register our transceiver device to match our car, just like we registered the payment card to match our bank account.
This is an important step because the Hi-Pass system is based on these terminals broadcasting your car information to the gate as you pass through, and your car info details need to match your actual car to determine the right charge. Tolls are not flat fees. They can vary widely.
How does the toll gate know how much to charge you?
Tolls change depending on a variety of factors like:
- Location of gate (busy area or rural, short distance drive or long)
- Size of car (smaller cars pay less; less wear and tear on the roadway)
- Type of car (electric cars often get discounts)
- Time of day (rush hour of off-peak)
- Status of car (is the car a personal-use car? Business related?)
- Discount type device use (i.e. Hi-Pass system vs. tap-and-go credit card vs. cash. Hi-Pass cards can net you 20-50% discount on tolls depending on a variety of factors, just like how using a T-money card for the subway/bus lets you pay a lower fare than the cash price.)
Registering a Hi-Pass terminal to your car via USB connection
 |
| exAgent active in Windows tray |
This portion, where we register our own OBU device, still requires a Windows PC to run the device connection software (.exe file), and works much better in Internet Explorer than Edge or Chrome.
So this likely will not work on a Mac. I doubt it will work in Linux either as the applet might run in WINE but probably will not transmit data between the device and the browser. Always keep an old spare Windows laptop around in Korea.
Workarounds
There are some workarounds to this if you really don't have access to a PC with Windows:
- Buy a device from your car dealer.
If you're buying a car, ask that they install the Hi-Pass reader for you and set it up on their end. Many cars with built-in readers already have this done. - Take it to a local mechanic shop.
The best are not the actual mechanics but the shops that sell/install these devices (where they also install black boxes, GPS navigations, etc). Even if you didn't buy it there, they can install it for a fee and will usually register it up for you. They also do other stuff like update your GPS navigation system if your maps are way out of date and you don't want to bother trying to (or can't, due to language or PC issues) run the update software yourself [note: many built-in car navigation companies offer downloadable installers for Windows that can update your navi's mapping database even after the "over the air" update support ends]. Again, expect a fee, usually of 20,000 to 35,000 for their time. - Take it to a Highway Services center.
Those office buildings usually right after a toll gate will often have offices where motorists can pay unpaid tolls, buy Hi-Pass related equipment, etc. They will register it for you. When I stopped by one they even had a self-serve kiosk with a mini-USB attached where you could immediately register your device. Otherwise you can ask at the help desk and they can do it for you. Don't worry, it isn't that strange a request as people buy these devices there or from rest stops (at least they did, in the days before Coupang). - Get a friend with an old Windows laptop to do it for you.
You certainly won't need Windows 11 for this (hell, XP would probably work), and the process doesn't depend on being connected to a particular computer. Just register and done. Once it's done, it's done.
The exCard website / exAgent app
This website is extremely useful if you plan on doing a lot of highway driving in Korea, because it is basically a portal where you can take care of all your toll issues. You can:
- check the status of any unpaid tolls
- pay any unpaid tolls online (this can also be done offline at locations like convenience stores, highway rest areas, etc.)
- register your Hi-Pass card reader device (as we are doing now)
- check the registration status of a used Hi-Pass card reader device and reset it
- view your entire history of toll payments
 |
| Registering a Hi-Pass terminal device |
This is a useful website, but as I said, if you are registering a "portable" Hi-Pass card reader terminal device like this, this website requires a Windows service agent to communicate with the terminal via USB connection.
Step 1 - install the exAgent
You download from the website an .exe file called exAgent, to manage the connection between the physical device you plug into your computer via USB, and the data from the website. This bridging is why we need IE and Windows. For now there seems to be no real alternative if you're doing this yourself.
The page at https://www.excard.co.kr/eHiPass/obuRegist.do will guide you into installing the exAgent first.
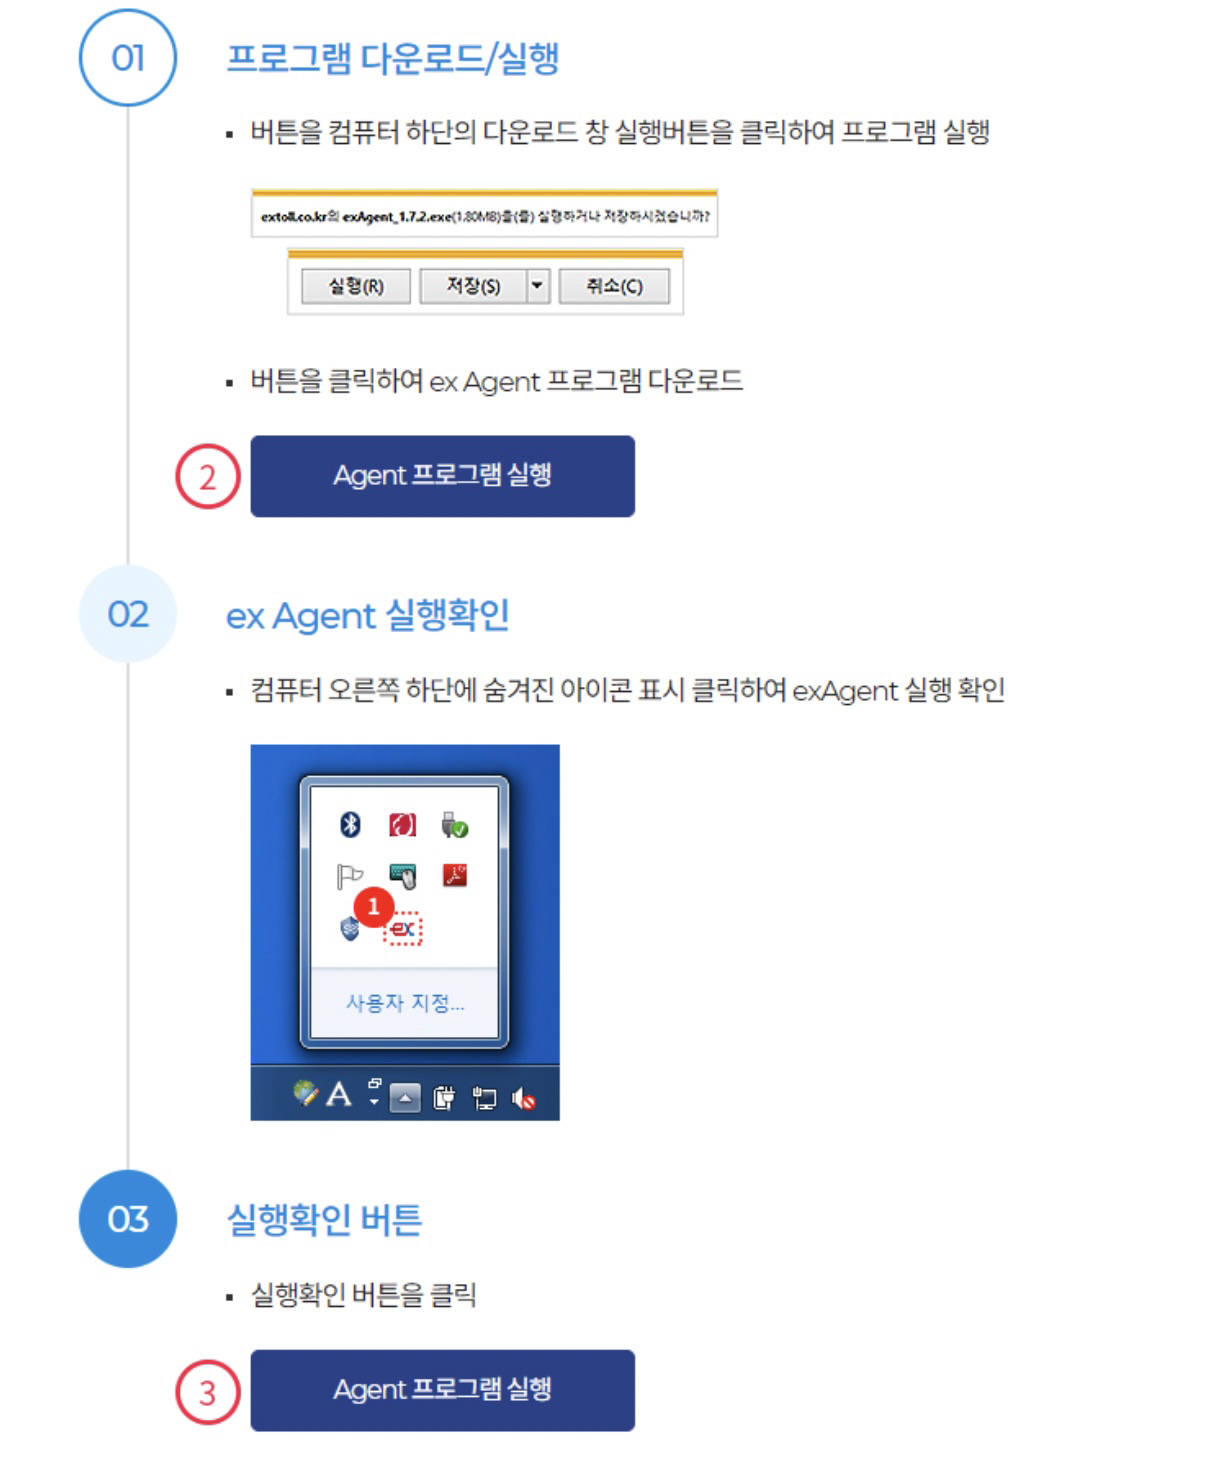 |
| Overview of downloading and running exAgent applet |
If you have any problems, the agent applet can be downloaded directly here:
https://www.excard.co.kr/eHipass/common/agent/exAgent_1.7.2.exe
Here's a successful install of the exAgent service.
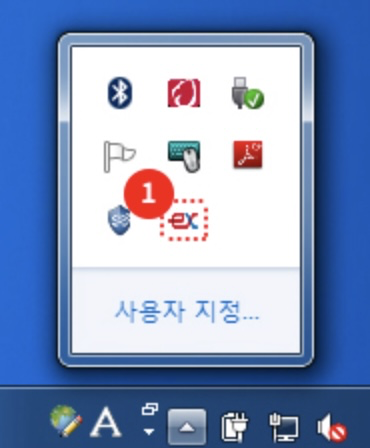 |
| exAgent bridge running in Windows tray |
It sits in the Windows tray like this. It doesn't really do anything on its own. It just facilitates communication between the exCard website and your Hi-Pass card reader device.
If you've got the agent up and running, you can proceed to step 2.
Step 2: USB connection check
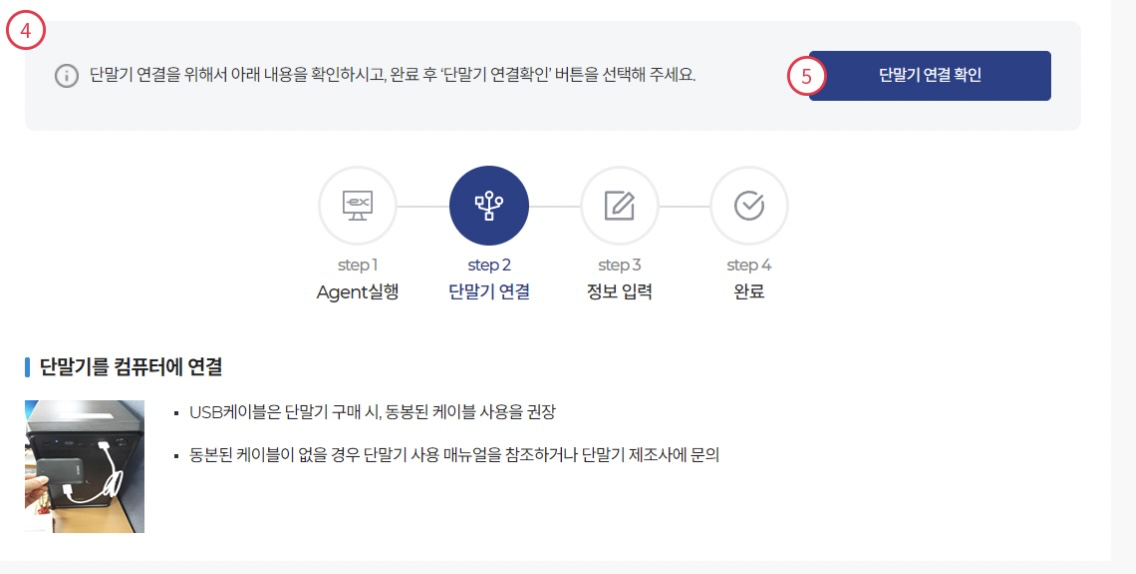 |
| USB connection to Hi-Pass card reader device check |
From the previous page, the site should now automatically begin verifying the connection, but you can also hit the blue button on top to test the connection itself. The website (again, only using IE) will attempt to communicate with the terminal device. Make sure you plugged it in to your computer before reaching this point.
If the agent applet is working, Windows will recognize it as a "Hi-Pass device" now connected, although nothing will actually happen. You want the exAgent applet running, but it does everything in the background.
If the website detects good communication with the terminal, it will automatically proceed.
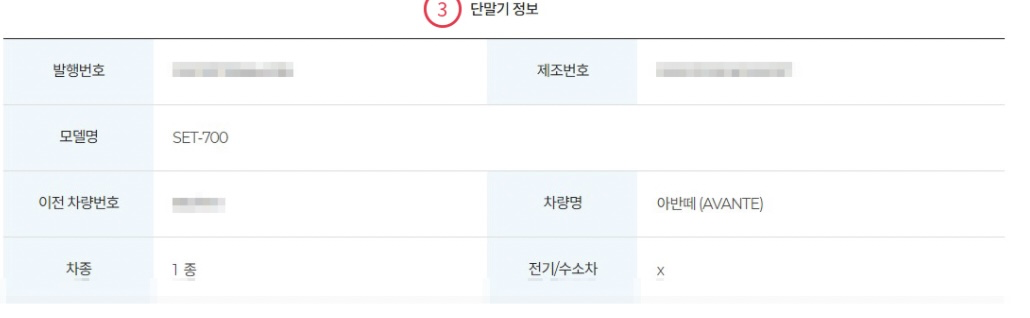
Step 3 - Input your car registration data
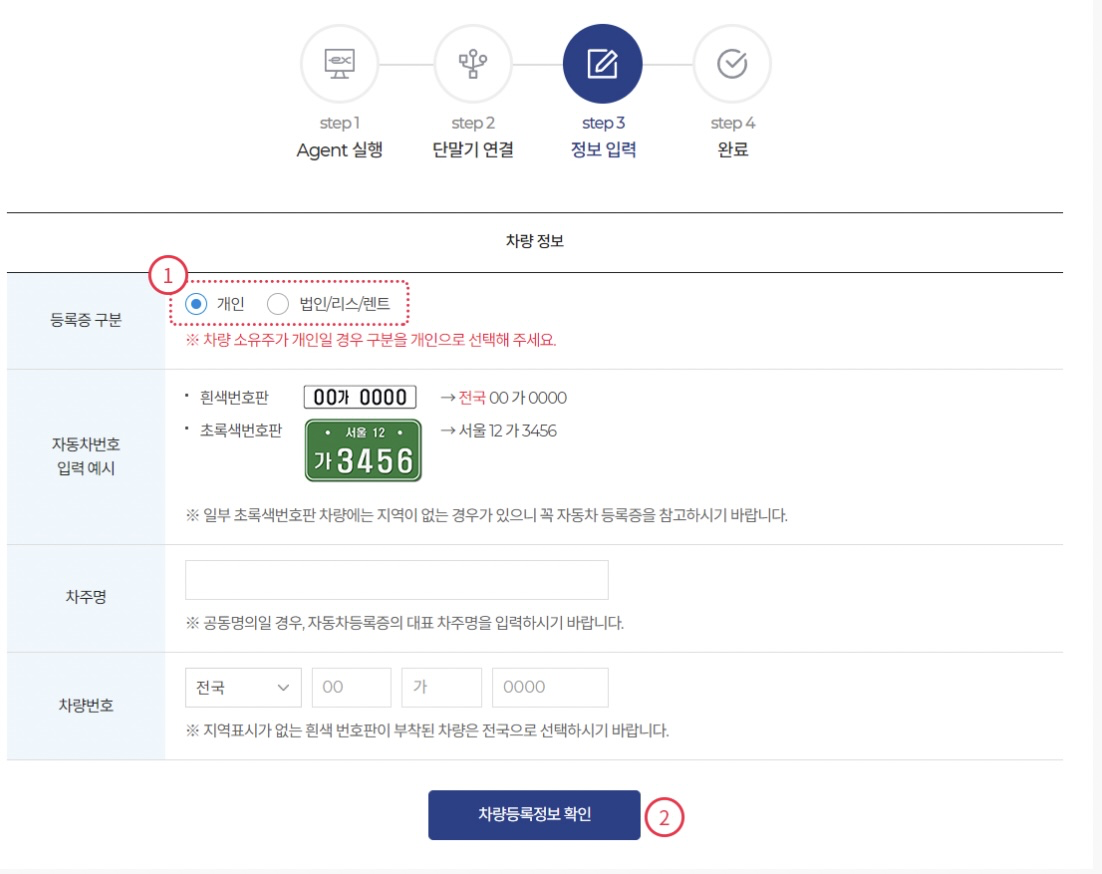 |
| Inputting car registration data to the Hi-Pass terminal |
Now just add your own vehicle registration to the terminal.
Just input the 차주명 (the name of the car owner) and the 차량번호 (the license plate). Unless your plate specifically has a location printed on it (most common on trucks, taxis, etc, not often on normal cars these days), just leave the initial setting at 전국 (nationwide).
Remember, the name of the owner of the car should match the terminal you're registering. The payment card inserted into the terminal can be anyone's, but the terminal itself ought to match the registration facts of the car. So don't register the terminal in your name if the car is registered in your wife's name.
If the info is all correct, it will auto-fill the details of your car, including the make and model, etc.
Step 4 - Contact details
Now move on to your contact info.
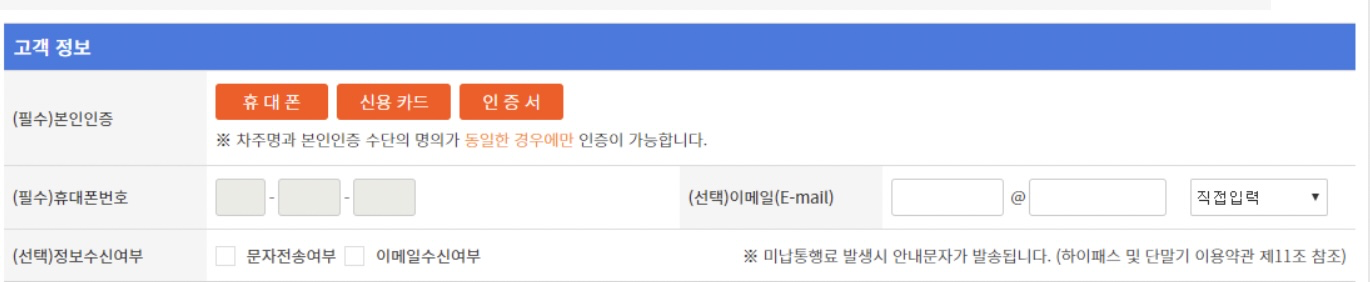
You'll need to verify your ID using one of the orange verification buttons. You can use your telecom service (if your phone is in your name), a credit card, or a certificate to verify. Then just enter your email/phone for contact and notices about your tolls.
Step 5 - Terms and conditions
Finally you'll be presented with multiple page tables of bullshit terms and conditions. Just agree to everything, who cares.

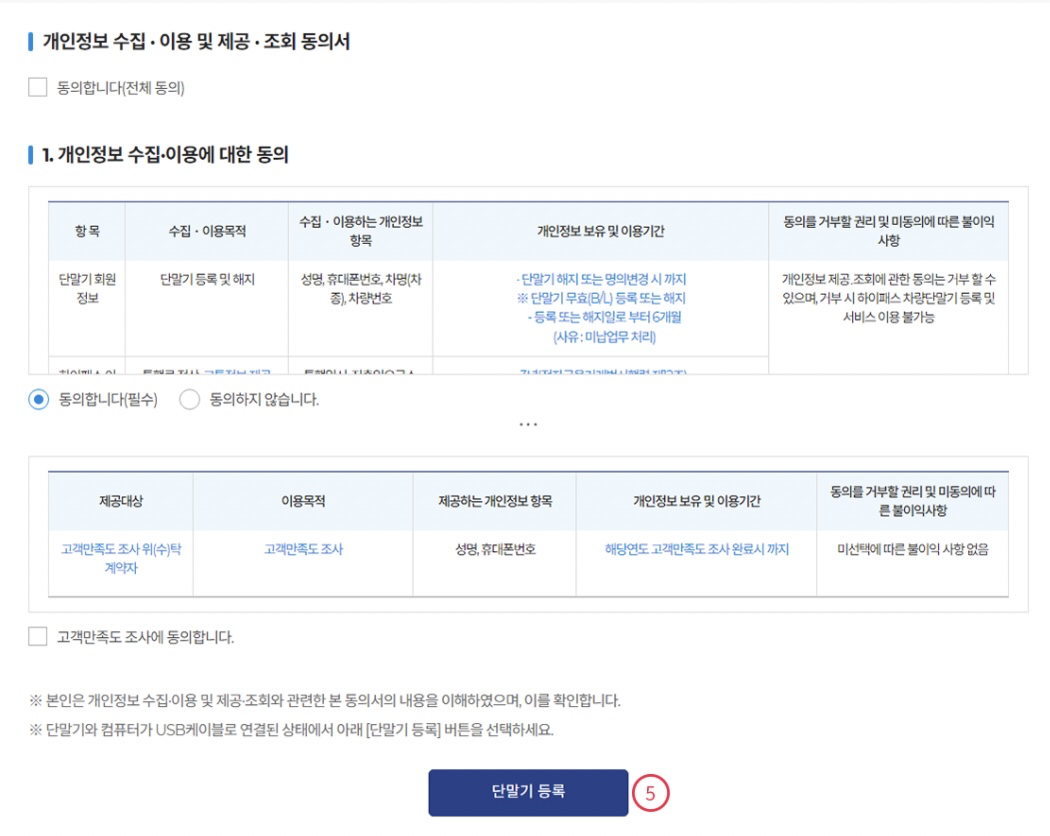
Or if you prefer not to be on blast with promotional content, just go through and manually check any box that says 필수 (required) and uncheck anything that says 선택 (optional). For example, do you really want highway accident status info texted to you? Maybe you do.
Hit that big blue button and congratulations! Your terminal is ready.
Well, not quite. Registration of new terminals can take 24 hours to complete. So don't go out racing through the blue lanes at toll gates just yet. Wait 24 hours to be safe.
Registering Hi-Pass card readers that come pre-installed in the car
I've been talking about the 자가등록 단말기 (Self-registration terminal). But what if you have a 룸미러 단말기 (Rear-view mirror terminal) or other hard-mounted device? [See my note at the beginning of this post on the difference between the two.]
Many cars now come with built-in Hi-Pass terminals, usually installed near the rear-view mirror and glued into the windshield that are not really able to be removed. Or, increasingly, they are the rearview mirror, like this:
 |
| Hi-Pass device integrated into rear-view mirror |
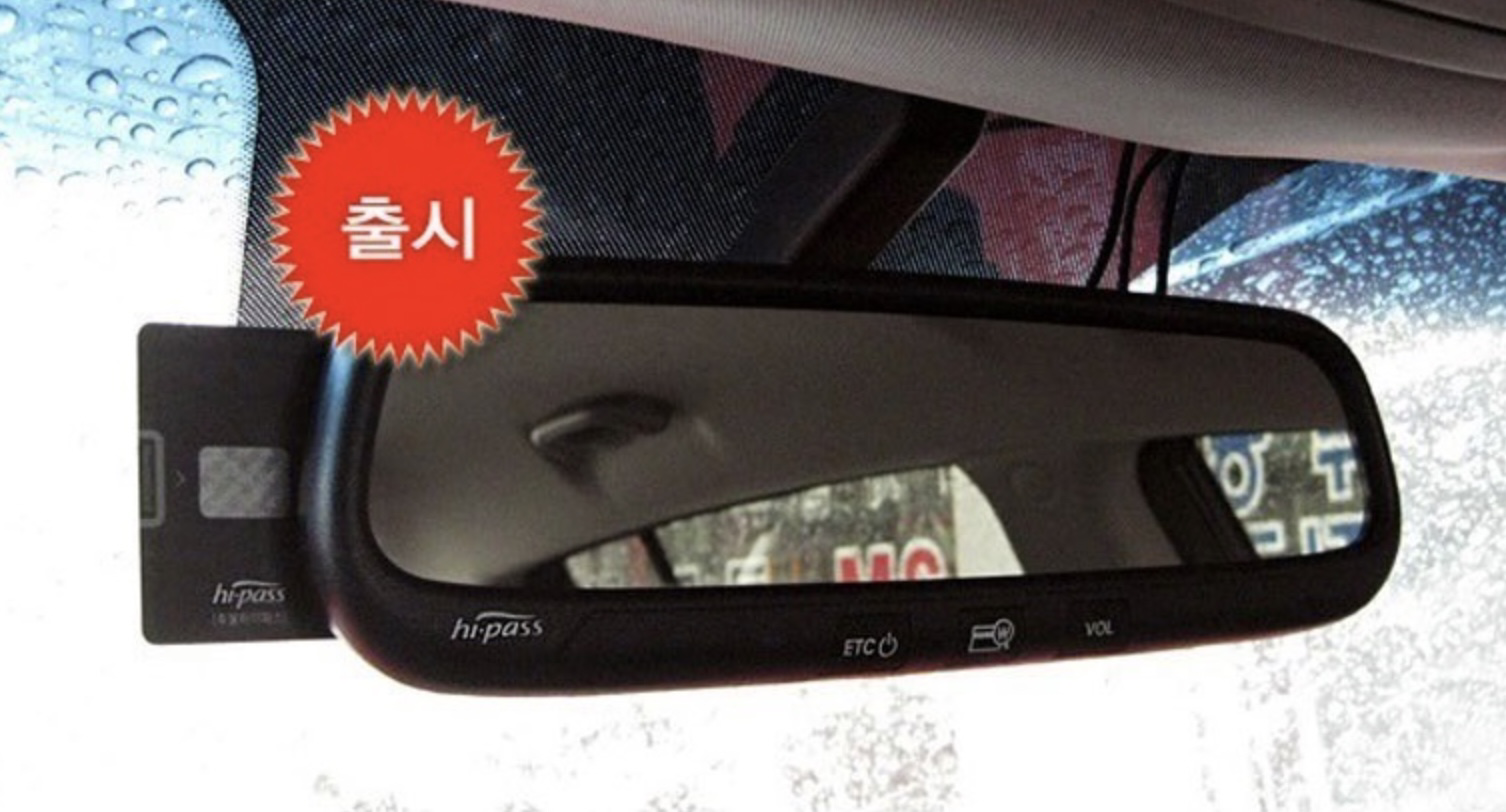 |
| Hi-Pass mirror showing the payment card slot |
Like I said before, if you buy a used car that has one of these or similar, you will absolutely want to re-register the terminal to be in your name, matching the ownership of the car. If you don't, you will likely be hit with fines and the Hi-Pass toll-gate alarm will sound as you speed through, because the system sees that the terminal you're using and the vehicle ownership info don't match. They need to match to prevent fraud. A Hi-Pass terminal must be registered to the same owner/vehicle in which it is installed.
Again, the payment card itself can be swapped out, no problem. But the terminals themselves always ought to be "paired" to the actual physical car it's installed in.
So if you bought a used car, and reregistered the car under your (or your husband's or wife's) name, you ought to have a new license plate for the vehicle. We will be switching the terminal's data of the old license plate to your new one. When registering a terminal, be aware that you must register it to the same class of car. You can't buy a used dump truck and try to register its Hi-Pass terminal as a compact car now.
Anyway it's luckily pretty easy to alter the registration of a built-in terminal if you did buy a used car with one. The exCard website has a section for 명의변경(USB미연결), for adjusting registration information on readers like this.
And since there's no physical wired connection you'll be making to such a device, you don't need to install the "exAgent" applet service for this. So in theory Chrome, Safari, mobile browser, Linux, macOS, everything ought to work for this process.
Let's take a look.
Changing ownership information of a built-in Hi-Pass terminal
This can be done at https://www.excard.co.kr/eHiPass/obuInfoChngNoUsb.do
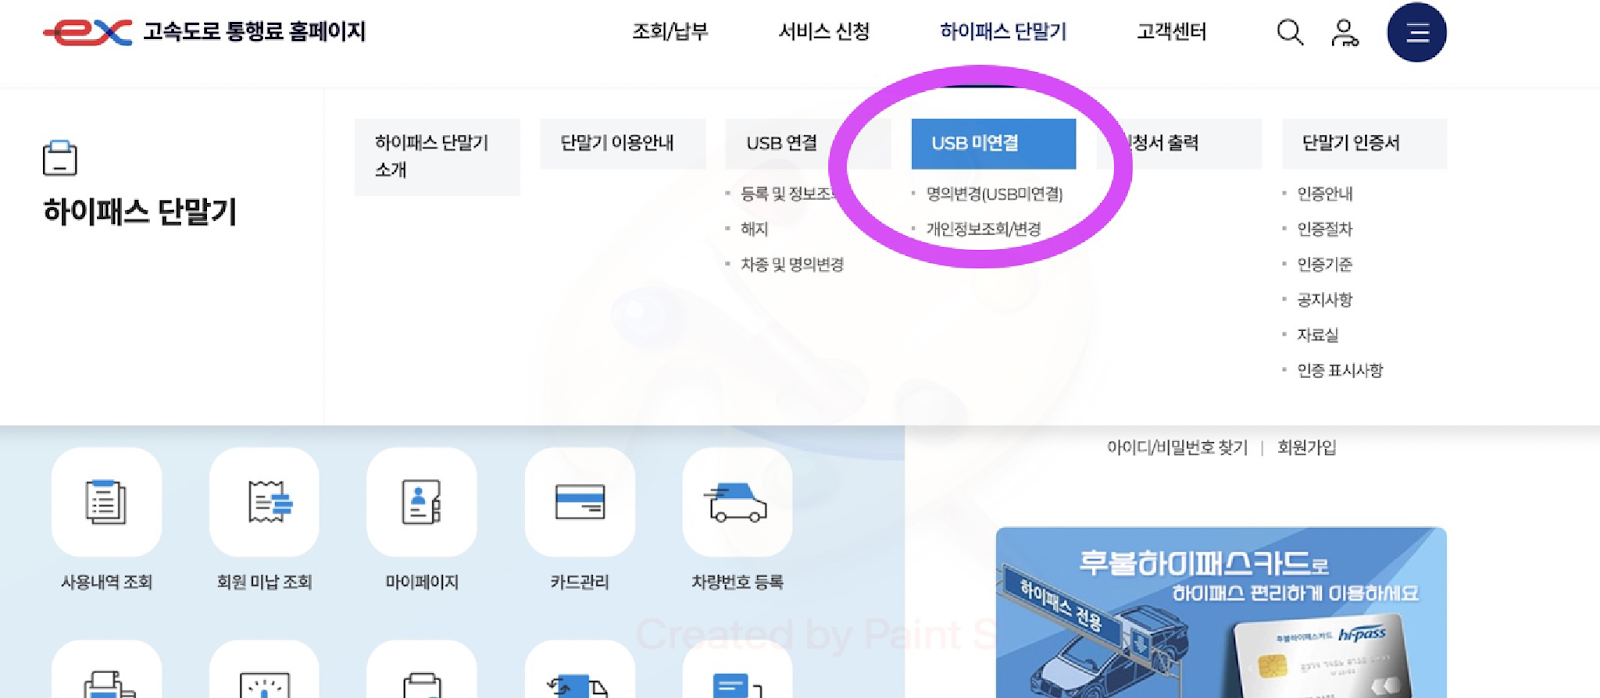 |
| Registering built-in Hi-Pass device |
The process is extremely similar to the method above for USB units, with some small changes:
- You won't need to install the exAgent applet
- You will instead need the device's issuance number
Step 1 - Input current terminal info
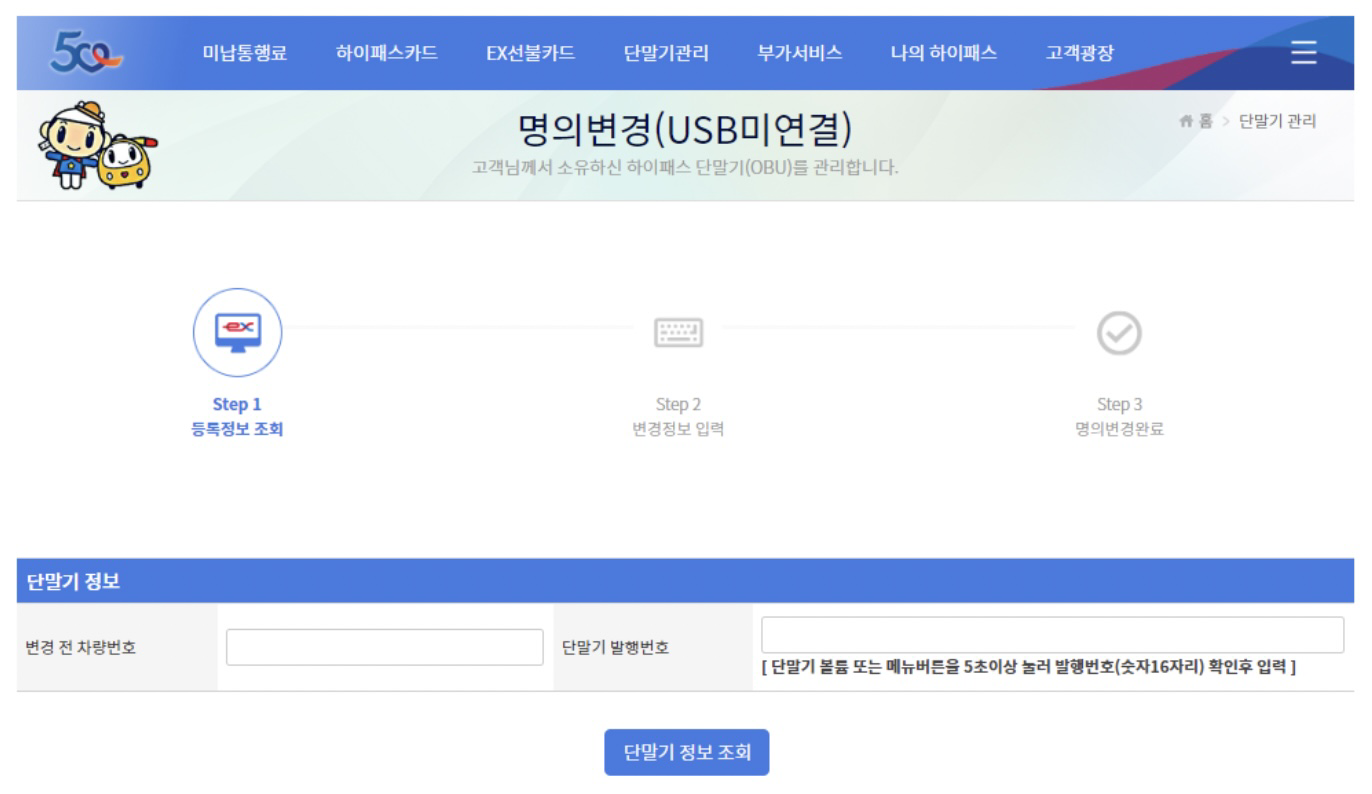
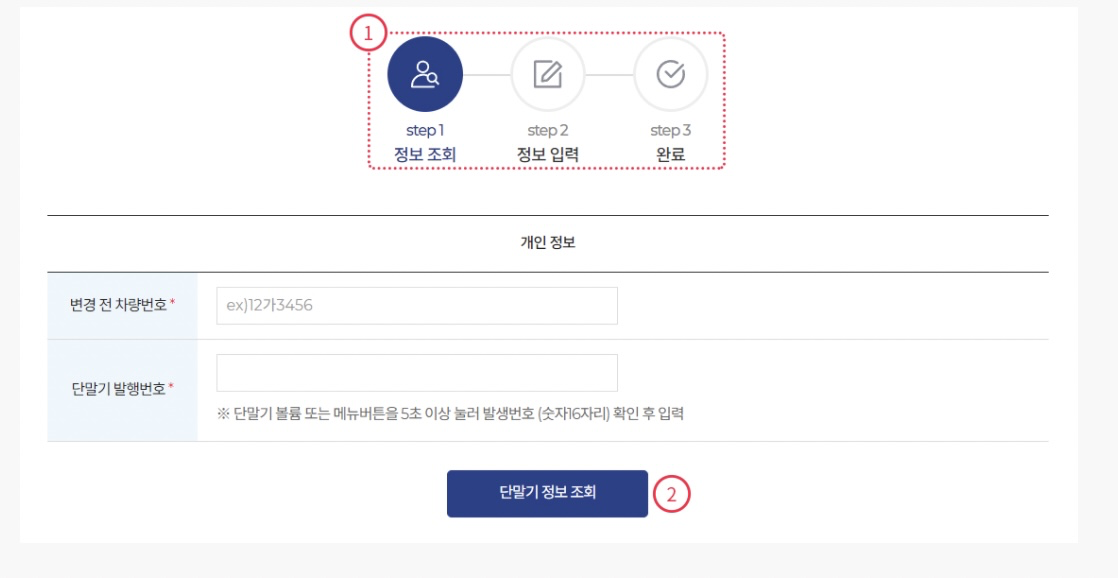
Start by entering the old license plate number of the car as it was before you changed the vehicle registration to your name.
Then enter the issuance number of your Hi-Pass terminal. This is a 16 digit code that you can access by holding down the VOL button on the device for 5 seconds. If it has a screen it will display the code. Otherwise it will read it out to you in a robot voice along with the other info associated with the device. Be sure to listen for the 발행번호 and I hope you have a pencil ready.
Step 2 - Check vehicle data
Enter that data, and it should automatically come back with a page with the details of the vehicle already filled in:
Step 3 - Input new ownership data (and continue same as above)
Final thoughts
And there are some nice other resources on this in English here:
- Detailed Information Regarding the Korean Expressway and HiPass System > The South of Seoul Blog
- No Need to Stop at Expressway Tollgates with the Hi-pass System! - Pyeongtaek.insight
And you may be interested in my other similar posts:
- English guide to the toll gate experience in Korea
- English guide to getting gas in Korea and some Korea driving tips
- Naver Map now available in English (+ screenshots & my review)
- Info and tips on Korean traffic enforcement cameras
Thanks for reading and enjoy speeding through the Hi-Pass lanes.
 |
| Hi-Pass lanes. Images: oneclock and rdsong |
Comments